In my role as an Assistive Technology Specialist, I had the privilege of presenting at this year’s ATIA (Assistive Technology Industry Association) 2025 National Conference. The title of my presentation was “Technology Beyond the Classroom: Using AT in a Self-Directed Program”. One of the topics during my presentation focused on using AT in creating the Person-Centered Plan. Below is an overview of what I discussed during the presentation.
If after reading this, you want to take a “deep dive” into the process and see the tools in action, let me know!
What is Person-Centered Planning?
In a previous blog post, I reviewed what a Person-Centered Plan is, and some different models teachers and families can use. According to the mass.gov handout:
“person-centered planning is a process, directed by the participant, intended to identify the strength, capacities, preferences, needs and desired outcomes of the participant. It should be the process by which any service plan of care, individual action care or plan, etc is developed” https://www.mass.gov/doc/per-centered-plandoc/download
Why should we use Person-Centered Planning?
Once a student turns 14 years old (in Massachusetts), they are invited to attend their IEP meeting, and Transition Services become a pivotal part of creating the IEP. If we look at how IDEA is currently written (§Sec. 300.43 Transition services) §300.43
“Transition services.
§(a) Transition services means a coordinated set of activities for a child with a disability that—
§(1) Is designed to be within a results-oriented process that is focused on improving the academic and functional achievement of the child with a disability to facilitate the child’s movement from school to post-school activities, including postsecondary education, vocational education, integrated employment (including supported employment), continuing and adult education, adult services, independent living, or community participation;”
https://sites.ed.gov/idea/regs/b/a/300.43
So, how can teams best prepare for this shift in the IEP? One pivotal way to achieve this is by using Person-Centered Planning.
Using Assistive Technology in the Person-Centered Plan
In this blog post, I am going to focus on how your child/student can use assistive technology so that they can participate to the fullest extent possible in creating their own Person-Centered Plan. Why is this important? QIAT: The Quality Indicators for Assistive Technology has created an indicator guide for assistive technology practitioners to use as guidance.
- “Transition plans for students who use assistive technology address the ways the student’s use of assistive technology devices and services are transferred from one setting to another. Assistive technology transition involves people from different classrooms, programs, buildings, or agencies working together to ensure continuity. Self-advocacy, advocacy, and implementation are critical issues for transition planning.” https://qiat.org/indicators/indicator-6-at-in-transition/
- There are 6 Indicator Statements, and the second indicator states, “Transition planning empowers the student using assistive technology to participate in the transition planning at a level appropriate to age and ability.” https://qiat.org/indicators/indicator-6-at-in-transition/
While the examples below illustrate specific technologies to “go along” with a specific plan, it should be noted that the assistive technology tools can be interchanged and used with the other person-centered plans mentioned. Interested in seeing these tools “in action”? Let me know!
- Using PDF Annotation Tools and Read&Write for Google Chrome with the Charting the LifeCourse Framework
The Charting the Life Course Framework provides all of its handouts as PDFs and at the time of this writing, it is available to everyone free of charge. Because the handouts are in PDF format, participants can save them in Google Drive/Google Classroom and use them in various ways.
- Annotating within the PDF using Kami: Students open the document and can insert text boxes within the PDF and type directly into it. If the student has a premium version of Kami, they can also use speech-to-text to insert their writing in the text box.
- If the student is in a district that is using Orbit Note, they can open PDF documents saved in Google Classroom or Google Drive. This program is more robust than Kami in that it allows students to not only create text boxes to type in, but also has speech-to-text, which allows students to dictate their responses directly into the text box. For students who prefer to type but require additional spelling support, the word prediction box can be turned on when a text box is created so students can use that tool to insert the correct spelling of the words they want to use.
- Students who don’t have access to either of those programs, or who may be using an iPad instead of a laptop or Chromebook, can have a similar experience using a couple of different apps.
- Snap Type Pro 2: Users can take a picture of the document and then insert text boxes within it. The students can either type directly into the text boxes and move them around, or they can use the built-in dictation on the iPad (speech-to-text) to dictate their responses.
- If students are looking for a more robust PDF reader, I have had success with the Claro PDF app. The user can either take a picture of the document or upload it if it is already in their Google Drive. Students can insert text boxes that they can either type directly in or use speech-to-text to dictate their responses. Students can also use the built-in prediction feature if they are using the on-screen keyboard on their iPad.
Once the students have used any of the above programs to fill in the PDFs that are part of the Charting the Life Course Framework, some students will take it a step further and put it all together into one document. L was able to do this while he was in school by creating a Google Slide deck, and we continued this method by having him transfer the information from his worksheets into a Google Slide deck for his ISP.
When he had his ISP meeting a couple of weeks ago, he was able to present this information verbally. He shared a copy of the packet with his support broker, who will then use it as part of L’s ISP. This information was invaluable because it was L expressing his strengths and weaknesses, his wants and needs, and it had him at the center of the ISP process, which is where it should be, especially when doing a self-directed program.
Because he has access to the premium license of Read&Write for Google Chrome, L was able to:
- Type directly into the slide. For spelling support, he was able to use the word prediction box.
- If he got tired of typing, he could use the speech-to-text feature to have the text dictated.
- When he completed each slide, he used text-to-speech to have the text read back to him. This allowed him to self-edit his work before I looked at it.
- He also inserted images to show what he has been working on over the past year and images to support his goals for the upcoming year.
All of these were ways that he could use his technology to be as independent as possible in creating his person-centered plan.
2. Using Book Creator and the PATHS Person-Centered Planning Model
In this example, I demonstrated how a student could use the Book Creator program to complete the PATH person-centered planning model. Book Creator is both a website and an iPad app. You can view the “books” within the program and share them as PDFs. What I like about this program is that it offers a variety of ways for students to express themselves.
In this picture, you can see how the student was able to use:
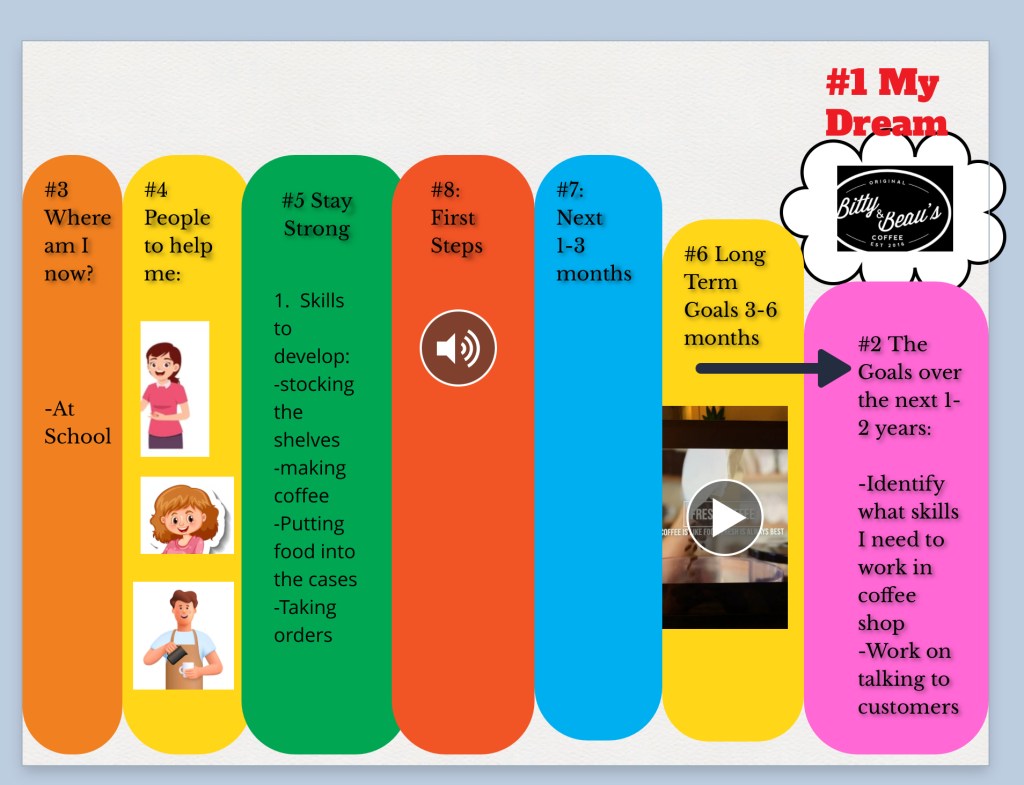
- Color coding representing each of the different areas of the person-centered plan.
- You can insert images from the photo library into the document. For example, if students are using an AAC device or a symbol-based program like Boardmaker or Lesson Pix, they can use those images and insert them into their person-centered plan.
- Another option is for students to create an audio recording and insert it into the book. This is different from using speech-to-text in that it is just going to do a straight audio recording; it is not going to convert what they are saying into text. I like this feature because many students would enjoy using speech-to-text because they are able to express themselves better speaking versus typing, but based on their articulation, the speech-to-text programs do not dictate correctly enough what they are saying. This can lead to increased frustration and potentially additional work for the student. So, I have found that for those students, inserting the audio recording piece is a nice way for them to use their voice to express what they want without worrying about the translation to text.
- Students can also insert videos into the book. In this example, the student was interested in working in a coffee shop. The team found a video on YouTube on how to make coffee using that particular coffee maker. They were able to insert that video into the book so that the student wouldn’t always have to go and find the video on YouTube.
What I like about using Book Creator in this example is that you can add additional pages to continue adding information. The team can create a year-long portfolio of what the student is working on related to their transition goals. This is a nice feature because it is a way to keep all the information in one place. The student can then present their Book Creator book as a portfolio (similar to what we did with the person-centered plan in Google Slides) at their next IEP meeting. Because there are so many different ways that the students can participate in creating this document, I find that it is very versatile for students to use at whatever output level they are at.
3. Clicker and the MAPS person-centered planning model:
The final example I will share is using the Clicker program to complete the MAPS person-centered plan. For those of you who are not aware of this program, Clicker is a writing program available on PC, Mac, Chromebook, and iPad. It is a comprehensive writing program that allows users to scaffold the writing process to allow it to grow with the student. It is also switch-accessible for students using switch access to interact with the computer.
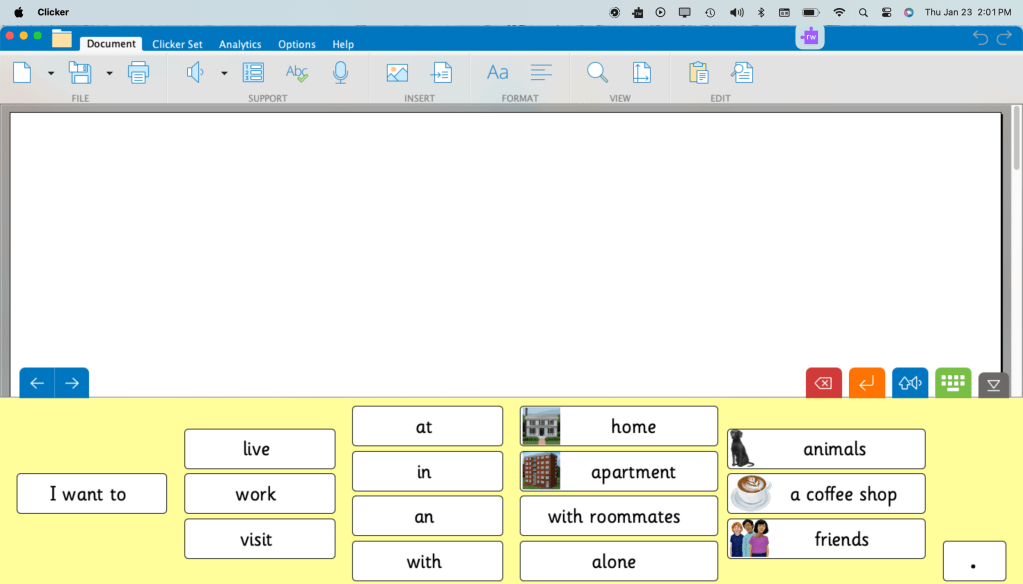
In this example, I created a Clicker Connect word bank. In the classroom or at home, the student would discuss with their team member the different areas of the person-centered plan, with the person writing down information that the student articulates. Then, the person will create the grids based on each section of the person-centered plan. The student then opens up the grid and uses it to create their sentences. You can have multiple grids within a grid set that the student can scan through and move around so they are not “locked” into one grid set at a time.
Once completed, the student can print out the document, which will print out just like a Word document. They can use this during their IEP or ISP meeting. With Clicker, you can insert images along with the text in the grid set, or insert just the text.
These are just a couple of ways that you can use assistive technology with your child/student to help them become active participants in their person-centered plan and in the creation of their IEP/ISP.
If you want to learn more about how assistive technology can help in person-centered planning, please contact me!
-Cheryl
Used with full permission from ©2025 Adaptech Consulting,LLC

One thought on “Transition 201 #4: Empowering Students by using Assistive Technology in Person-Centered Planning”